If you are throwing a Tiki party or Hawaiian luau and want an extra special Tiki decoration to use a centerpiece or greet guests, this tutorial is for you!
Not only is this project cheap (you can probably make it for less than $30) but also you may find it working it’s way into your permanent décor – especially if you have a fun room for entertaining.
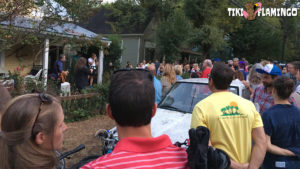
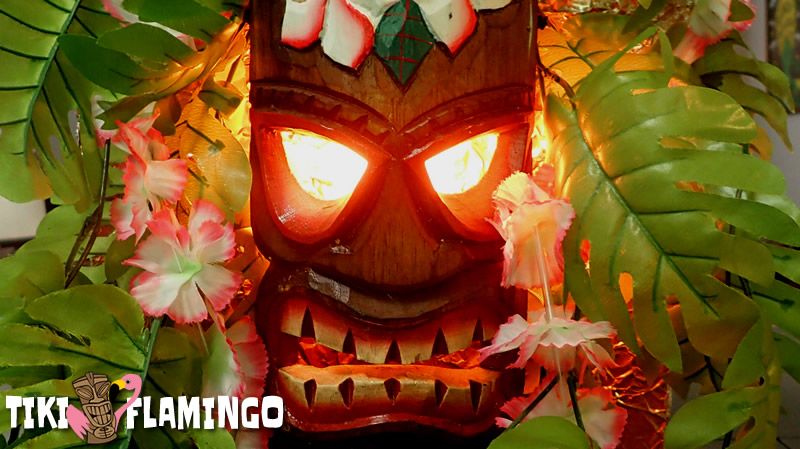
I originally created this Tiki idol decoration to hang over a stage for a backyard party here in Athens, GA where it was a huge hit – especially after the sun went down. But after the party, I found a very special purpose for it and it has been hanging (and lighting up) my living room everyday since.
I simply plugged my fiery-eyed Tiki mask into the auxiliary power plug on the back of my vintage stereo receiver. Now, when the stereo is on, the Tiki mask lights up the living room with a fiery glow!
I know you are excited, so let’s get started making your fiery-eyed Tiki idol!
What You Will Need
Keep in mind that this tutorial is for what was originally a thrown together party decoration built from odds and ends laying around the house. Keep that spirit alive when following along and don’t be afraid to improvise or substitute. I’ll do my best to describe what I used and make some suggestions for alternatives where possible.
The Tiki Mask
The cost and look of this project is ultimately going to be determined by the Tiki mask and fake foliage you choose. The only rule here is that in order to get the “flaming eyes and mouth” effect, the eyes and mouth of the mask need to be open (or cut out) – as you would expect a real mask to be.
The best and most commonly found Tiki masks to use are made out of a light wood and the absolute best place to find a large selection of them is Amazon. For this tutorial I am using this 12” Tiki mask but if you prefer a larger one, just adjust measurements and materials to fit.
The Tiki Idol Base
The base (maybe backing plate is a better description) for your Irery-eyed Tiki idol decoration is the part where you can keep things simple by using a flat board, or get creative and make something more complex. This is the part where you balance creativity with whatever you can find lying around the house.
I wanted my Tiki idol to hang in a corner so I used two pieces of wood and bolted them together at an angle with metal brackets. If you want to keep things simple, you should just use a flat piece of thin plywood.
The best plywood to use is 1/8” since it is strong yet light, but ¼” plywood wood, or anything similar with the rigidity of plywood, should be fine.
The LED Flame Effect Light Bulb
The LED light bulb is key to this decoration’s cool effect and it is one place I wouldn’t skimp for low-quality bulb. And absolutely make sure it is an LED! Conventional bulbs generate a lot of heat which could create a serious fire hazard in any DIY project. The great news is that the best LED flame effect bulbs generally cost under $10!
Another important feature the LED bulb must have is the ability to give the fire effect when upside down. If the bulb you have doesn’t work well upside down, I would buy one that does. If you have to mount the light at the bottom of your decoration, the hardware will be visible through the Tiki mask’s mouth.
The LED light bulb I used looks amazing, is energy efficient, and doesn’t generate much heat at all – again, an important consideration when throwing together party decorations that plug into the wall.
The lamp socket you choose can determine the complexity of your project. If you can find a cheap lamp socket with a mounting tab (like this one on Amazon), it will save you a lot of time and hassle.
Fake Foliage
Truly anything goes in terms of the fake foliage you use and there is a huge selection of fake decorative tropical vines on Amazon that all work well.
To keep a tropical look, however, you will want to choose one with bigger palm or monstera leaves. You’ll only need about 8 feet of running vine for this project, so keep that in mind when choosing your garland.
If you want to add flowers to give your idol some additional color, an easy way is to use an Hawaiian lei. I had one lying around that matched the plumeria flowers carved into my idol and it took less than a minute to weave it into the garlands.
What? You don’t keep a handy supply of Hawaiian leis around the house? Let’s remedy that right way!
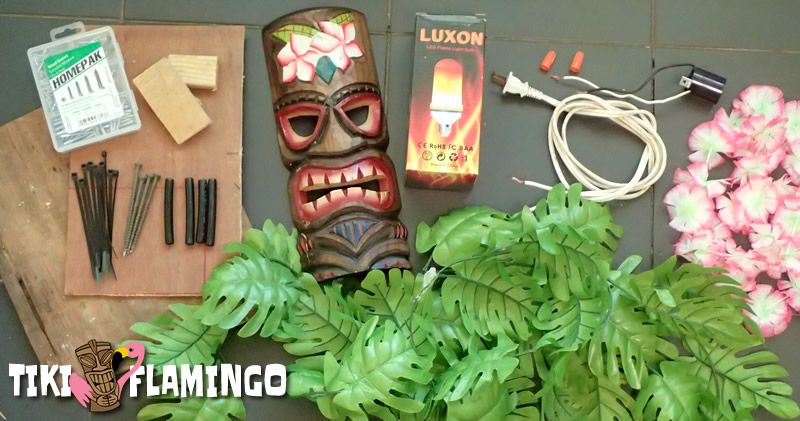
Materials
Below is a recap of all the supplies I used: Read through the whole tutorial first before buying supplies to determine what the best approach for you will be based on what supplies and tools you have already. Let your creativity be your guide when gathering materials for your fiery-eyed Tiki idol decoration.
- Tiki mask (with eye and mouth cutouts)
- LED flame bulb
- Lamp socket receptacle
- Cheap extension cord
- Electrical nuts
- Aluminum foil
- Spray adhesive
- Wood glue
- Red spray paint
- Scrap plywood (¼” or ⅛”)
- Scrap tubing (or blocks of wood)
- Long drywall screws 3 ½” 2 3/4” tubing
- Metal brackets
- Miscellaneous, screws, bolts, nuts
- Plastic vines
- Hawaiian lei
Tools Needed
You don’t need much in the way of tools for this project and the most difficult thing you will encounter is cutting the wood. If you keep to ⅛” plywood, you might even be able to cut it by carefully scoring with a utility knife. Let safety and common sense be your guide here.
A short list of tools is below, but if you get creative with your base or how it is mounted to the wall, keep in mind you may need additional tools.
- Saw
- Drill with bits
- Phillips head screwdriver
- Wire strippers
- Utility knife
- Pencil
Building Your Fiery-Eyed Tiki Idol
Now that you have everything together, let’s get started!
Step 1 – Creating The Base
Your base should be the same height as your mask and hang off each side around 2 or 3 inches. For a 12” tall mask that is around 5” wide, use a piece of plywood measuring approximately 12” x 10”. And when I say approximate, I mean you could be off either measurement by an inch or two and be completely fine.
For my angled base plate, I used two pieces of ⅛” plywood measuring 12” x 6” each. I found some metal brackets in my junk box and used them to attach the two pieces of plywood together at an angle, but you could use wood and glue or some other method to attach your base pieces together. Get creative!
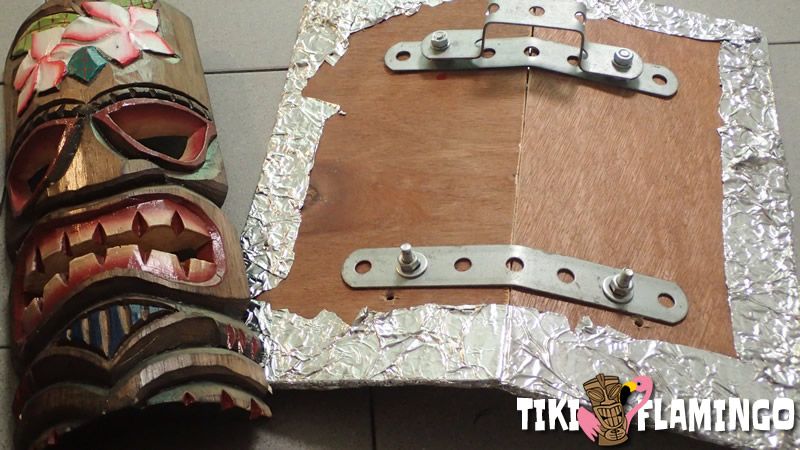
Step 2 – Mounting Holes for Your Tiki Mask
Next, you are going to need holes in the base to mount your mask in a later step. These locations of these holes don’t have to be exact, so use my measurements as a general guide and focus more on the procedure.
On the back of my 12” mask, along each side, I measured down approximately 2 ½ “ from the top and 1 ¾” from the bottom and started a hole with one of the 3 ½” drywall screws. The wood in the mask is very soft, so just get the holes started. With a pencil, make a tiny mark on the side of the mask where your hole is located.
Next, place your mask on the backing plate where you want it. With the pencil, trace the outline on both inside and outside of the mask near the marks you’ve made. then, in the center of the outline, make four matching marks and drill out these out so that the threads of the drywall screws you are using pass easily through.

Step 3 – Prepare Your Light and Mask Mounts
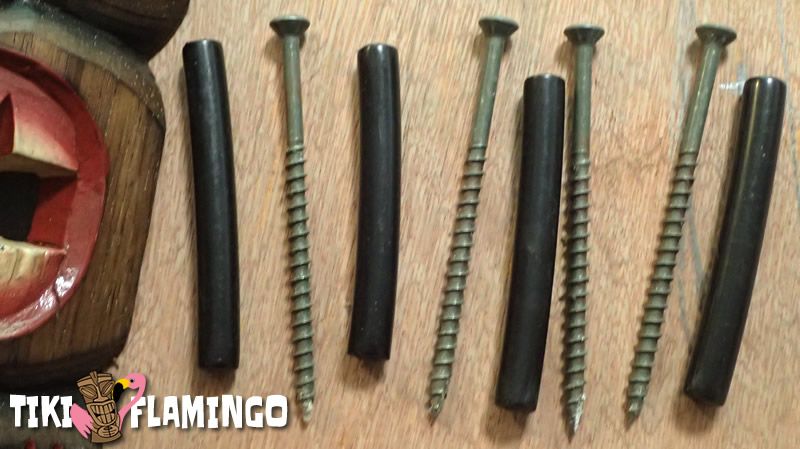
It’s important at this stage of your project to determine how you are going to space out your mask from the base. I used some tubing I had lying around the garage that had an inner diameter that allowed the drywall screws to pass through. But you could also use small blocks of wood and drill them out.
What is important here is the measurement. for 3 ½” drywall screws, you want to have your tubing or blocks cut to 2 3/4” in length. Once you have these cut, set them aside.
Now, cut a small block of scrap wood that is about ½” to ¾” thick to a small square or rectangle that is around 1 ½” to 2” on each side. Again, it doesn’t have to be exact and doesn’t have to look pretty. This will act as a spacer to move your lamp socket far enough away from the base to accommodate the LED bulb.
At this point, I went ahead and glued my lamp spacer to the center of the top of the mask side of my base. You could also just screw it with small screws or bolt it on with the lamp socket at a later step. Skip to the photos in the steps below to see the exact location if this isn’t clear.
Step 4 – Attach Your Wall Mounting Hardware
I’m not going to get into much detail here as there are all kinds of ways to mount your Tiki idol to the wall and how you mount it will mostly be determined on the wall surface you are mounting to and the hardware you choose (or find around the house).
The finished decoration will weigh about the same as a medium sized picture with a glass frame, so any mounting hardware made for hanging a similar-sized picture will be fine. I had a bunch of those metal brackets, so I just bent one and used the existing bolts to hold it in place.
Keep in mind that you may not even want to mount your Tiki idol on the wall. If you follow the instructions here, it will also stand on its own and make a great table or mantle decoration. You can also add wall mounting hardware at a later time.
Step 5 – Lava Time!
Let’s make a cool lava reflector out of your base! Pull off a large sheet of aluminum foil that is several inches larger than your base. If your aluminum foil is not as wide as your base, just patch together two pieces, applying them one at a time. It doesn’t have to look pretty!
Now, crumple up the aluminum foil and then re-flatten leaving plenty of bumps and creases. Spray the least reflective side with spray adhesive and then spray the mask side of your base as well.
Once the spray adhesive is tacky enough, apply the aluminum foil to the mask side of your base. It may rip a bit around your light socket spacer, but that is perfectly fine – no one will see it. Now, flip the base over and spray additional adhesive around the edges to anchor the excess aluminum foil and give your base.a finished, reflective edge.
To really punch up the lava effect, you can lightly spray the reflector side of your base with red spray paint. Don’t overdo it though – you only want a light dusting of red so the foil shows through.
Step 6 – Attach Your Lamp Socket and Cord
It’s time to attach your light socket! If you’ve got a lamp socket like the one recommended, it should have a little mounting tab. Simply screw this to the lamp spacer.
You can simply run the wires over the top of the base, but I preferred to drill a hole at this point and push them through so that they came out the back. See the photos below for clarity.
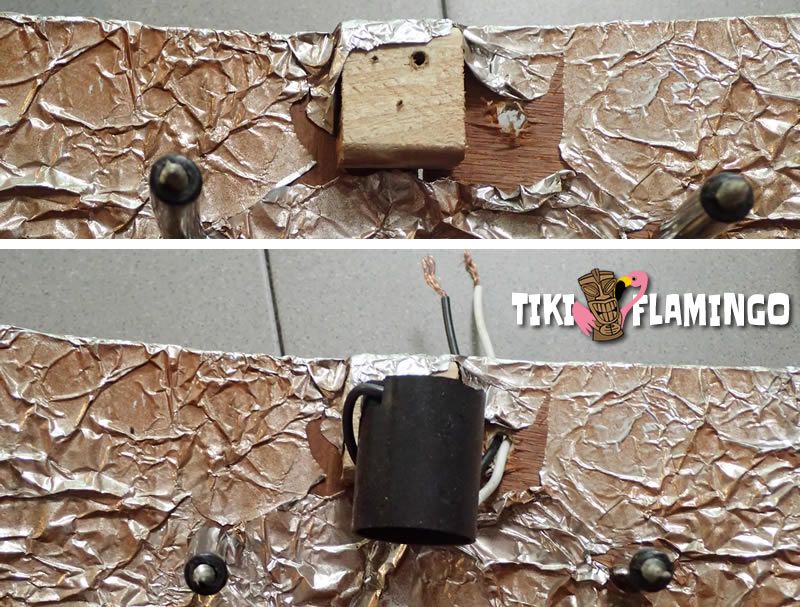
Next, cut off the receptacle side of a two-prong extension cord and strip the wires. Attach these to your lamp socket wires with the wire nuts and use a few zip ties to secure the wires together so they won’t pull apart if tugged. I zip tied my wires to my mounting bracket for extra security.
At this point, you can also attach an inline switch to the cord if you wish. Since I have mine plugged into the back of my stereo, I never had a need for one.
Step 7 – Attaching the Tiki Mask
This step can be a little tricky and because the wood the masks are usually made out of is very soft, you have to be very careful.
Insert your four drywall screws through their holes and put the spacers (tubing or wood) that you’ve created on the other side. Carefully screw the four screws into the holes you started in the mask. Go slowly and do not over tighten. If they are even close to snug they could strip out.
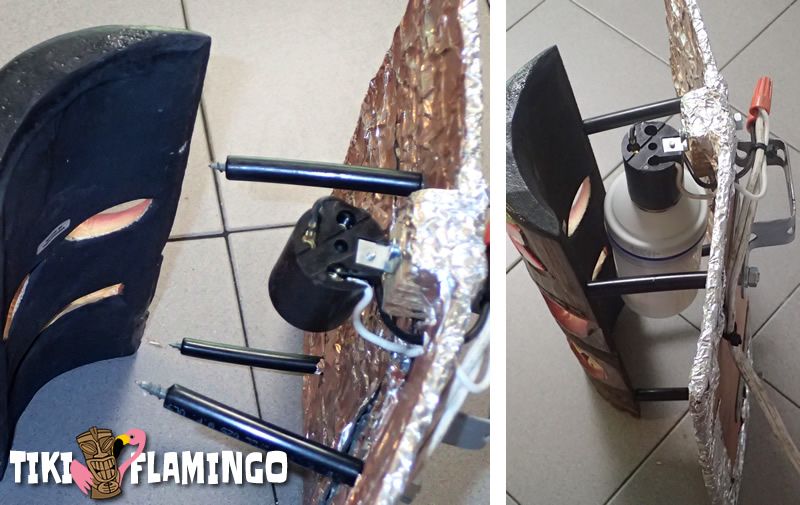
Also, the mask may split a little where the screws go in. This is no big deal. Use wood glue or even super glue to hold the mask together here.
Next, go ahead and screw in your LED light bulb. Plug it in and test to make sure it lights up okay.
Step 7 – Attaching the Tropical Foliage
How you attach your foliage will mostly be determined by your creativity and what you have to zip tie the vines to. In the end, your goal is to hide the edges of the base and let the foliage hang down for a “viney” jungle look.
On mine, I zip-tied two strands of approximately 24” on either side of the back of my base. I then divided them so that one from each pair hung over.each side of the idol, with two crossing at the center of the top of the idol. This filled in the top of the base with a small mound of foliage and helped diffuse light coming out of the tip of the idol.
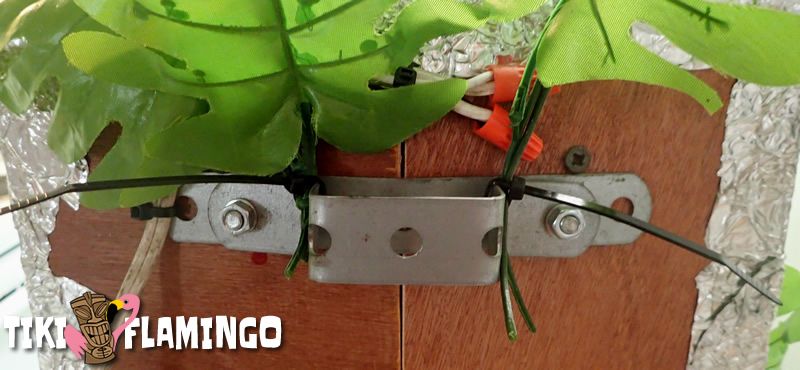
If you don’t have anything to zip-tie onto on the back of your base, you can just lay strands of foliage over the top of your decoration, zip-tying them to the top screw spacers that hold the mask to the back plate.
If you want to add some flowers for color, just put a synthetic Hawaiian lei over your idol and weave into the leaves.
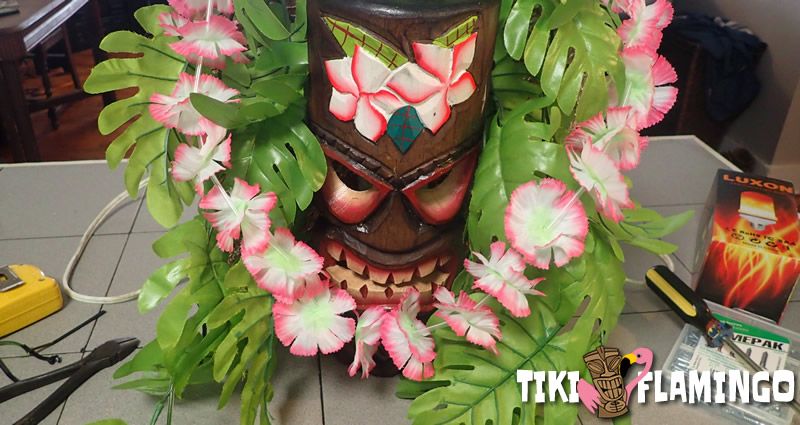
Your Fiery-Eyed Tiki Idol Party Decoration is Done!
Plug that sucker in and see how it looks! You may want to adjust the foliage now that the light is on, but once you are happy with it, get back to planning that Tiki party or Hawaiian luau!
Once your Tiki party is over, don’t stash your Tiki idol away in some closet. There are so many ways you can incorporate your fiery-eyed Tiki idol into your day-to-day life!
You could always plug it into a stereo receiver as I did, but you could also wire it up to your electric garage door opener light and mount it to the wall of your garage so that your Tiki idol greets you every time you come home. It also makes a great wall hanging for a home office and gives you something to stare vacantly at during long Skype meetings.
Here at Tiki Flamingo, we stand by our resolve that all of us need more Tiki in our lives. Thank you for following our tutorial and spreading the Tiki love! – Greg