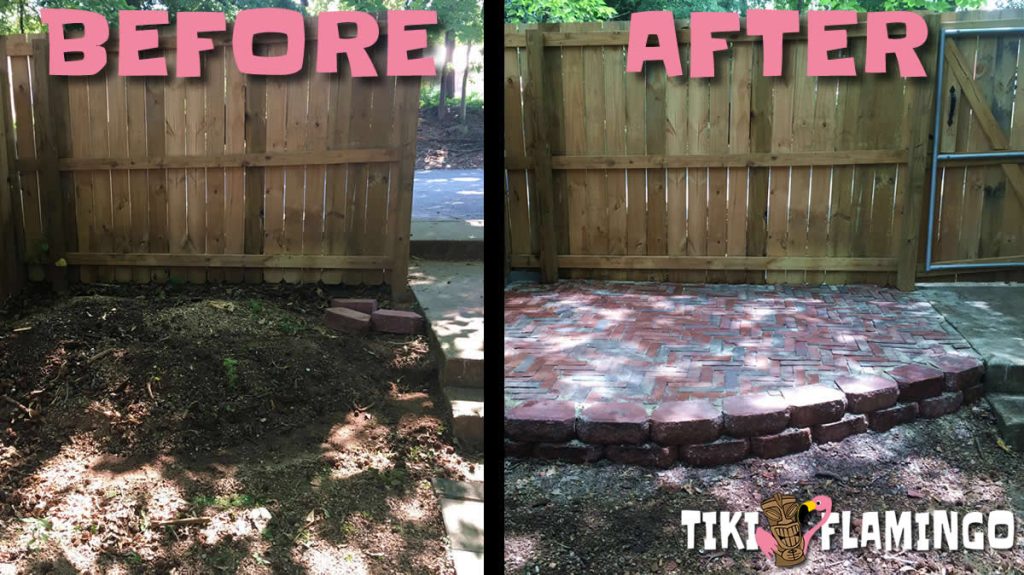
If you are looking for an inexpensive way to transform a bland, featureless yard into a super cool party spot, a DIY patio made from repurposed brick, stone, and pavers could be just the thing.
A patio constructed of recycled brick and pavers is one of the most inexpensive ways to create a fun space in your yard and add value to your property.
There is of course quite a bit of labor involved in making a patio, and you will need some tools, but all the patios pictured on this page were built for less than $30!
And we should mention that the instructions below are not for a patio built with cement. This is a super cheap and easy project that will produce a patio that can be altered, removed, or added on to with minimal grief and toil.
Finding Brick and Pavers
If you want to build a patio for next to no money, the key is in sourcing used or discarded brick, pavers, stones, and sand. You can always supplement what you find with store bought materials, but generally you will find that patience pays off. Just keep on looking until you have what you need.

Keep Your Eyes Peeled
The first rule for finding free building materials is simply to keep your eyes peeled. Drive around your neighborhood early on weekend mornings and see what is out by the road. Don’t be surprised if you also come across cool furniture, discarded art work, and other building supplies.
Also, look out for new construction at an older property. Maybe your neighbor is doing some landscaping and removing a garden wall or walkway. If you hear about an old home or building being torn down, you could end up with enough brick to build something really elaborate.
Another common place to find discarded brick is in wooded areas. Follow old road beds and you will almost always come across old dumping sites where piles of brick are common. Obviously contact any property owners before setting foot on their property and ask permission before removing any materials. More often than not, they will be happy to let you clean up their property for them.
One last thing to keep in mind is that piles of brick in the middle of a forest can mark the spot of an old homestead and may be of historic importance. Before you remove any old brick and stone you come across in the woods, do a little research and reach out to local history experts to make sure you are not destroying something of importance to future generations.
Reach out to Friends and Family
Why not get more eyes and ears out there searching for you? Let friends and family members know that you are looking for discarded brick, pavers, and stone. This is also a great way to come across sand you will need to bed the bricks or pavers when making your patio. If you know someone with grown kids, there is a good chance there is a forgotten sandbox in the corner of their yard that they would be happy for you to come over and remove for them.
Scour the Web
More often than not, if someone has an unwanted pile of brick or pavers, they will advertise on Craigslist and Facebook garage sale groups. Usually they are just looking for someone to haul them away and are offering them for free. You can also put your own ad on these services letting people know you are looking for bricks, pavers, or sand in exchange for removing them.
Stockpile for Future Projects
If you end up with a small pile of brick or pavers, but it isn’t enough to build the patio you had in mind, simply wait – more materials will turn up. While you are trying to source the brick and pavers you need, don’t be too selective – especially when you are just starting to collect supplies. You can always mix different materials to create cool patterns in your patio.
Also, don’t make the mistake of turning down badly worn bricks. Repurposing very old, weathered brick produces a beautiful patio that looks like it was made dozens, if not hundreds, of years before. By using older, aged brick, you can also get away with a patio that is less flat or has an more uneven surface. The majority of the hard work in creating a patio has to do with making everything perfectly level and smooth.
What You Will Need
Now that you are raring to go, let’s go over a more specific list of what you will need.
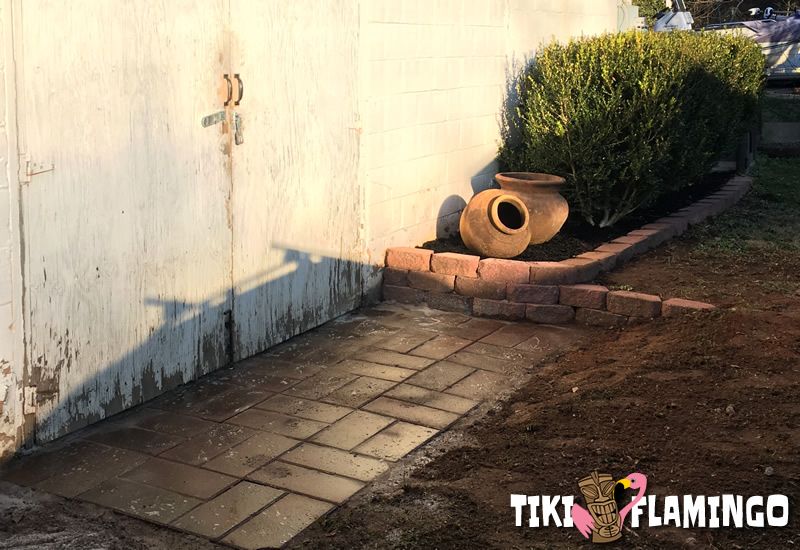
Bricks, Pavers, and Stone
As mentioned above, don’t be too selective with what you bring home when just starting to source free pavers, brick, and stone. You may have an idea in your mind what exactly you want, but won’t be able to find those exact materials. Be flexible and let your creativity get you over any shortfalls in supplies.
Keep in mind that you may want a wall or border to define your patio space. Having plenty of extra materials on hand can help your vision grow and improve as you create it in real life. You can also use the same techniques outlined in this article to build garden pathways and pond decks.
Play Sand
There are actually two different types of sand that you will need if you really want your patio to last: play sand (like you would find in any child’s sandbox) and polymeric sand.
The play sand is extremely important as it will act as a bed for the pavers, stones, or bricks that you will use. To determine how much you will need, level and smooth out the area where you intend on building your patio, and roughly calculate how much sand you would need to cover the area in about an inch of sand. Plan for a couple of 5 gallon buckets extra that you can use to fill in any unsightly gaps. Don’t pour it out until you’ve read this entire article!
If the dirt you are working is very loose and can be raked flat very easily, you may be able to get away without the play sand and just lay your pavers directly in the dirt. But this is not recommended unless you just can’t get a hold of any sand.
You can also mix sand with the top layer of soil to make it easier to work with. This is actually the approach used in the various patios on this page.
Polymeric Sand
The second type of sand, called polymeric sand, is optional, but highly recommended. This is a fine sand that contains binding agents that are activated with water. Polymeric sand is brushed into the cracks of your freshly made patio then sprayed with water to lock the bricks or pavers in place.
Another advantage of using polymeric sand is that it will keep weed growth in between your pavers to an absolute minimum. If over time, weeds start growing again, simply scrape out the groove in between the bricks or pavers and apply more sand.
Unlike cement or grout, polymeric sand does not harden like concrete and can be chipped away quite easily if you decide to make changes or even remove your patio at a later date.
Again polymeric sand is optional, but really makes a patio strong and eye-appealing. For each patio on this page, a 5 gallon bucket of polymeric sand was purchased at a local home supply store for under $30 and this was actually the only money spent on materials.
Tools
With a little luck, you might already have the tools you need to get started, as most are common to every household.
Below is a recommended list:
- Round Nosed Shovel
- Flat Shovel
- Hard Rake
- Shop Broom (Or broom that can get filthy)
- Small garden trowel
- Four foot level (a straight board and the level on your phone can make a good substitute.
- Hammer (a chipping hammer is ideal, but a claw hammer will suffice.)
- Small stone chisel
- Garden hose (or 5 gal bucket to transfer water to your work site)
If money is extremely tight and you don’t have all the tools mentioned above, know that you could get away with just a few basics like a shovel, a rake, and a trowel, and then amend your project to make up for the lack of tools. For example, coming up with a pattern for your patio that won’t require you to cut any brick or pavers will remove the need for a hammer and chisel.
Imagination
The most important thing you need is imagination. You will be defining the space and creating something where there was nothing. If you feel limited by budget or materials, let that feeling go and let whimsy and creativity take its place. You will be amazed at what an amazing patio you can create out of a junk pile of mix-matched bricks and pavers.
Just cut loose and let your inner child play. This is a party patio after all, so even building it should be fun!
Planning Your Patio
Once you have a big pile of materials to work with, it is time to figure out a good approach to the layout and pattern that best suits your project, materials, and personal taste.
The tough part of any patio is the edges. If your pattern and layout cause you to have to cut a large number of bricks or pavers along the edges, then you may want to consider a simpler approach. Alternatively, you can always fill in the gaps along the edge of your patio with small stones, pea gravel, polymeric sand, or a combination of all three.
In getting started, you don’t have to completely layout the entire patio, but laying out a test section and calculating how that pattern will proliferate across the space will help keep you on track once you are underway.
If you are using flagstone or some other type of large, irregular-shaped material, the best approach is to just jump in and do it. It really isn’t worth the time to try to lay everything out in advance.
What makes a good patio pattern is purely subjective and there is no reason you cannot mix patterns and materials in fun ways. You can even go free form and just make it up as you go along!
To stir your creative juices, let’s go over a few common patterns used in making patios out of brick and pavers.
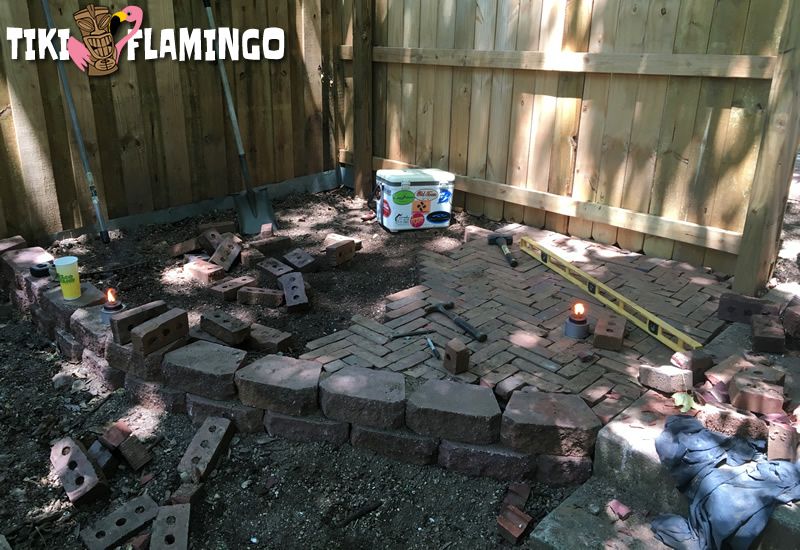
Herringbone
Herringbone is a very classy pattern that has an old world look – especially when you are using well-aged brick. If you want an elegant look and have a large supply of uniform brick, this is a great pattern to consider.
It’s also a great pattern to use if you have the type of bricks with holes as it works well when you lay the bricks on their side to build your patio. Keep in mind that you will use much more brick with this approach, but your patio will be also be much more solid due to the added thickness.

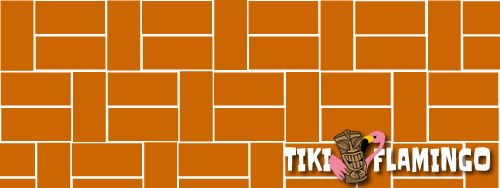
Basketweave
If you are working with an area that is square or rectangle, this will be the easiest pattern to use to build your patio. With a little luck and some adjusting of the size of the area and space between the bricks or pavers, you may get by without having to cut any along the edges.
It should be noted that this pattern will not work if the bricks are to be laid on their edge as mentioned in the herringbone pattern above. The basketweave relies on the brick or pavers long side to be exactly two times that of the short side.
Lay our brick or pavers out on some flat ground in the pattern first to make sure it works with your materials.
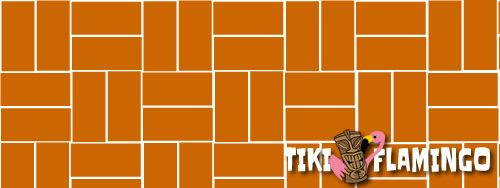
Half Basketweave
Like the above basketweave pattern, the half basketweave is a good choice if you are creating a patio in a square or rectangle space. Whichever you choose is more about personal preference, but you may find that by using one or the other, it will keep you from having to cut any bricks along the edges.
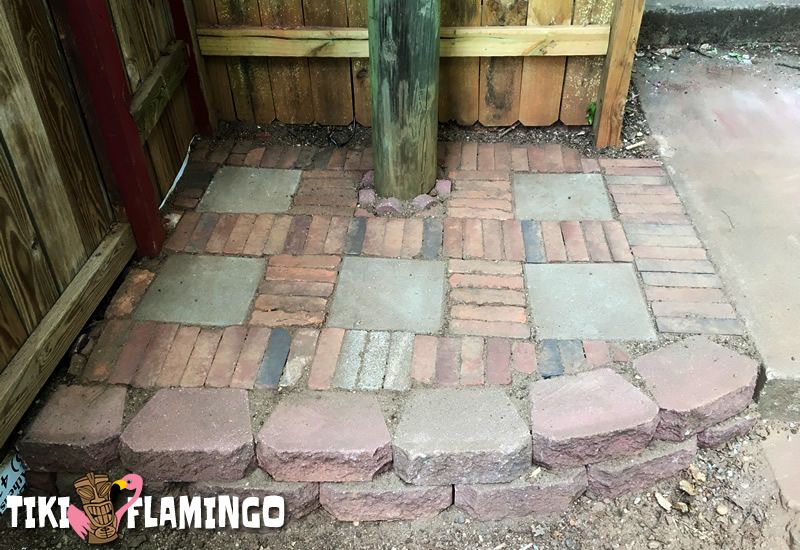
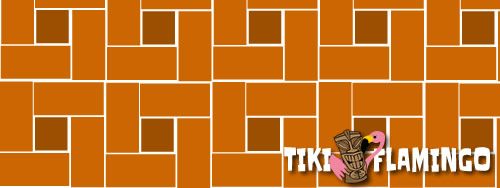
Pinwheel
The pinwheel pattern is a great choice if you have mix-matched materials and want to get a little extra creative. It is also a good choice if you are laying your brick on its side or are using an odd shape of paver.
In the pattern below, you could easily replace the dark squares of brick with appropriate-sized stones, pavers, gravel, decorative tiles, or even colored bottle bottoms.
Let’s Make a Patio!
Before you get started, keep in mind that you will be working close to the ground for many hours or even days. This can be back-breaking if you don’t make your comfort a priority.
Some people prefer to work on their knees, others sitting in a low chair. Whatever works for you, make sure there is plenty of padding between you and any hard surfaces.
If you are going to work on your knees, knee pads or a big garden pad are worth their weight in gold. It is a good idea to have a small whisk broom to make sure the area beneath your knees is free of small stones and pebbles. Kneeling on a small stone is a whole new kind of pain we encourage you to avoid.
Lay out all of your tools and supplies in such a way that you will not have to strain to access them. Having a cooler of water or other cold beverages on hand is also a good idea – especially if it is hot and you will be working in the sun. Again, make your comfort a priority.
Once you get started, take breaks often! Stand up, walk around, and stretch before you get tight. In the end, you will go faster is you are not miserable or in pain. Making a patio is hard work but it can be relaxing and fun with the right attitude and approach.
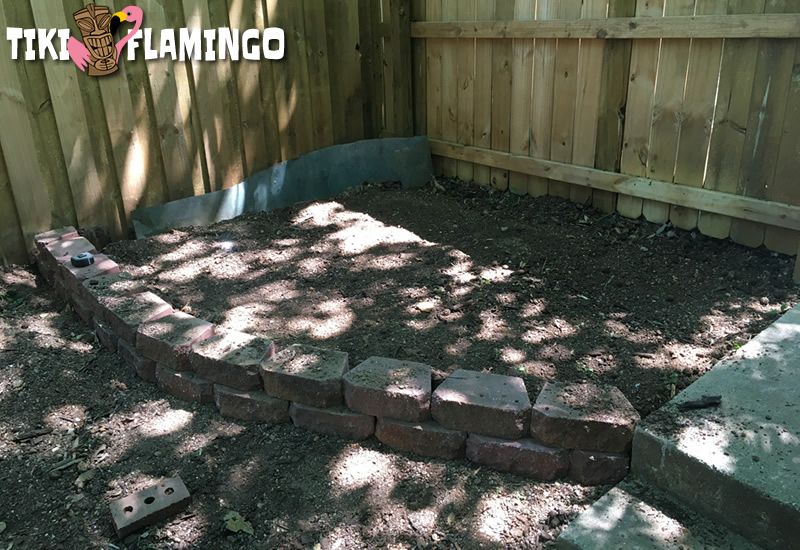
Step 1: Outline your Patio
Hopefully you have already taken care of this step in the planning stages, but this is also where the rubber hits the road. Check again to make sure both the layout of your patio and the pattern you intend to use is going to work.
Step 2: Level the Ground
The next step is to clean and level the area where the bricks or pavers will be laid. Pay very close attention to how rainwater drainage will flow onto and off your planned patio.
While a perfectly flat patio looks great, sometimes giving it a slight pitch or even adding a slightly depressed “trough” across the patio can help tremendously with drainage and keeping the patio from getting puddles.
At this stage, you could use stakes and string if you want to get very meticulous, but I’ve often found having a good plan in my head, laying the first row of pavers and using the 4 foot level to guide me from there is good enough.
Remember, this is a budget patio and your time is money!
Step 3: Prepare the Bed
Ideally, you would want to pour in the bedding sand and rake it perfectly flat. This is how the professionals do it and this method is great if you are working with uniform materials, but if you are mixing bricks and pavers, doing it this way can slow you down.
Alternatively, I recommend adding a layer of play sand on top of the soil as you go, rather than pouring it all out ahead of time. This method is much faster since you can more easily adjust for the various thicknesses of the materials you are using.
Regardless of which approach you take, plan so that your patio surface will be about ⅜” higher than you want it, as the sand beneath the bricks and pavers will compact about this amount.
Step 3: Lay the First Pavers
The first bricks or pavers should be set at about ⅜” higher than your desired surface height. This is the amount the bedding material should compress down once the patio has settled over time.
Important: Do not tamp down any of the newly laid surface until the entire patio is finished!
Each paver you add should end up perfectly level with the previously laid materials. If it isn’t, carefully remove it and adjust the sand beneath it until it is. The key to creating a smooth, level surface is to be perfectly uniform with what you do to each brick or paver.
If you have prepared and leveled the entire bed beforehand and are using only one type of paver or brick, this part will go pretty quick. Just carefully lay the pavers or bricks so that they touch as you lower them into position. Never slide a brick or paver in the sand as you put it into place.
If you are using the second method above for uneven materials, hold the brick or paver that you are laying so that it level with the previously laid materials, then use your trowel or gloved hand to pack sand beneath it. The trick here is to use your 4 foot level, or a straightedge and a smaller level, to guide you as you go.
Why this second method works so well is that if you are laying a thick brick next to a thin paver, you can adjust the bed on the fly and make sure each piece of your patio is level with the pavers or bricks around it.
Again, don’t tamp down any bricks or pavers until you are finished. It is much easier to tamp them all down when you are done, and even if you don’t, the patio should settle on it’s own over time.
Step 4: Recheck the level and pitch
Regardless of which method you use, stop often and check to make sure the surface you have created so far is level, or pitched at the desired angle.
Also, take a few strides away and look at your work from a distance at various angles to make sure you are still on track. Even with a level, it is easy to create a dip or rise if you don’t get up once in a while to check your work.
Step 5: Finish the Edges
However you finish the edges of your patio, it is important that they are anchored well as they will be holding the bedding sand in place. If an edge fails, it can cause erosion underneath the patio surface which can lead to dips and warps in the surface.
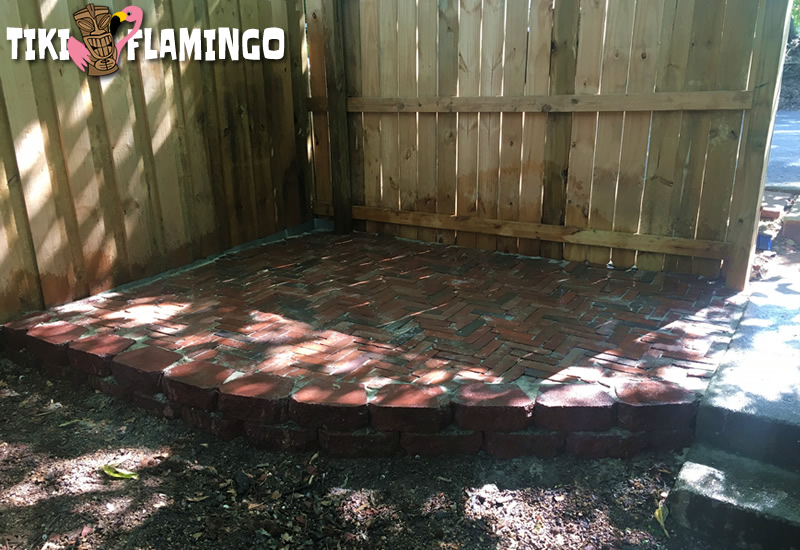
Step 6: Finishing Your New Patio
If you’ve made it this far, you are undoubtedly pretty excited, since it already looks like a patio. But this one last step will really make it pop and help keep it looking like a patio for long into the future.
With a stiff brush or shop broom, sweep off all the sand and dirt from the surface. If you are going to be using polymeric sand, you actually want to remove a bit of the sand that has built up in the cracks between pavers or bricks so that there is a noticeable gap between them.
If you are not using polymeric sand, look over the patio and pour play sand into any gaps between pavers or bricks that are not filled. work it in with the broom or brush, then sweep off the patio and repeat the process until you see no gaps.
For polymeric sand, pour the polymeric sand into the gaps and work it in with the broom. Like the method above, repeat the process until you are sure all the gaps are completely filled.
Finally, carefully hose down or pour water on the patio. Regardless of the sand you are using, you want to make sure you don’t splash it out from the cracks. the polymeric sand will be activated by the water and will start to lock, so make sure you remove any residual sand on surfaces that you do not want it.
Party on the Patio!
Congratulations! You just built a super cool backyard party spot! All that’s left to do is to put out some chairs and tables, stock up the cooler, fire up the grill, and call some friends!